Knowledgebase
SHOUTcast Radio Hosting, Internet Radio, Audio Streaming, AutoDJ Radio Servers > Knowledgebase > Internet Radio Streaming Tutorials > How to connect Butt Encoder to SHOUTcast / Icecast
How to connect Butt Encoder to SHOUTcast / Icecast
How to connect BUTT Encoder to a SHOUTcast v1 / v2 or Icecast server
You only need the server address, port, password and (for Icecast) the mountpoint from your control panel.
BUTT is ideal when you send audio from a mixer, audio interface or microphone directly to your internet radio server. It runs on Windows, macOS and Linux and is very lightweight.
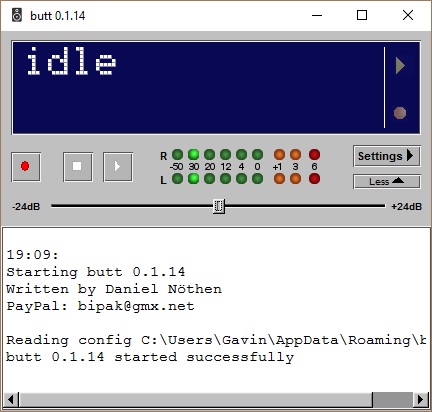
1) Download and install BUTT
- Go to the official download page: https://danielnoethen.de/butt/
- Download the installer for your operating system (Windows, macOS or Linux).
- Install BUTT and start the program.
2) Get your server details
Log in to your streaming control panel and locate the encoder / connection details. You will need:
- Server address (Host) – for example
stream4.yourdomain.com - Port – for example
8000or another custom port - Source password – the DJ / encoder password
- For SHOUTcast v2 – stream / station name (used as metadata)
- For Icecast – mountpoint, usually
/streamor/live
Keep this page open so you can copy and paste the values into BUTT.
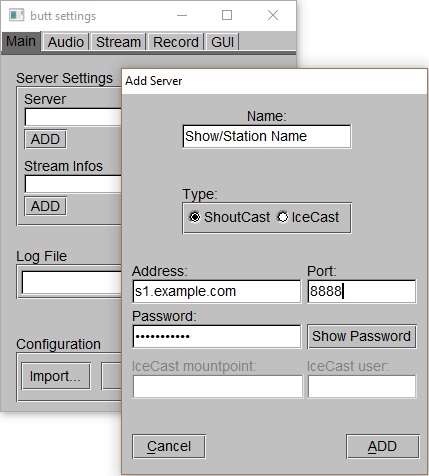
3) Open BUTT settings and add a new server
- In the BUTT main window click the Settings button.
- In the Main tab, find the Server section.
- Click the ADD button to create a new server profile.
4) Configure SHOUTcast v1 / v2 in BUTT
SHOUTcast (v1 and v2, basic mode)
In the Server settings dialog fill in:
- Name: any label, for example
My Station – SHOUTcast - Type: choose SHOUTcast
- Address: your server host, for example
stream4.yourdomain.com - Port: your server port, for example
8000 - Password: your source / DJ password
For most SHOUTcast v1 and v2 hosting this is enough. The SHOUTcast v2 server accepts the same connection format as v1 when configured by your provider.
SHOUTcast v2 with stream ID (if your host requires it)
Some hosts give you an explicit Stream ID (SID) for SHOUTcast v2. In that case:
- Keep Type as SHOUTcast.
- Use the host, port and password from your panel.
- If your panel shows a “mountpoint” like
/stream/1or SID=2, follow the exact instructions in their documentation, because different panels handle SIDs in different ways.
5) Configure Icecast in BUTT
If your server is Icecast2, select the Icecast mode instead.
- Name: for example
My Station – Icecast - Type: choose Icecast
- Address: your Icecast host (for example
icecast.yourdomain.comor the IP) - Port: your Icecast port (commonly
8000or8001) - Password: your source password from the panel (sometimes called “source” or “DJ” password)
- Mountpoint: the path where the stream is available, usually
/streamor/live
Example Icecast configuration in BUTT:
- Type:
Icecast - Address:
icecast.yourdomain.com - Port:
8000 - Password:
mysecretpassword - Mountpoint:
/stream
If you use AutoDJ + live DJ switching, your host may require a specific mountpoint like /live. Always use exactly the mountpoint shown in your control panel.
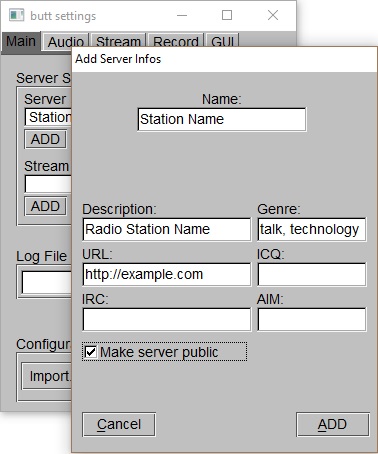
6) Add stream information (metadata)
In the same settings window, look for the Stream Infos section and click ADD. Fill in:
- Name: your station name
- Description: a short description or show name
- Genre: the main music genre
- URL: your website, for example
https://www.example.com - Make server public: enable if you want to be listed in public directories (if supported by your host)
Click ADD to save the metadata profile and then Save / OK to close the server settings window.
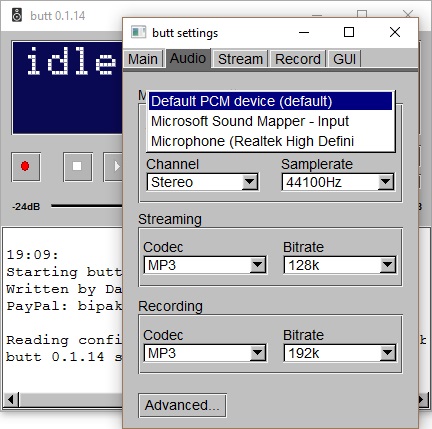
7) Configure audio device and quality
- Back in the main Settings window, open the Audio tab.
- Choose your Audio Device:
- Use Default Device if you want to stream what your system outputs.
- Use your external audio interface if you stream from a hardware mixer.
- Use your microphone input for talk-only streams.
- Choose the encoder settings:
- Codec: MP3 (most compatible with SHOUTcast and Icecast)
- Bitrate: usually 96–192 kbps, for example 128 kbps
- Samplerate: 44100 Hz
- Channels: Stereo for music, Mono if you want to save bandwidth
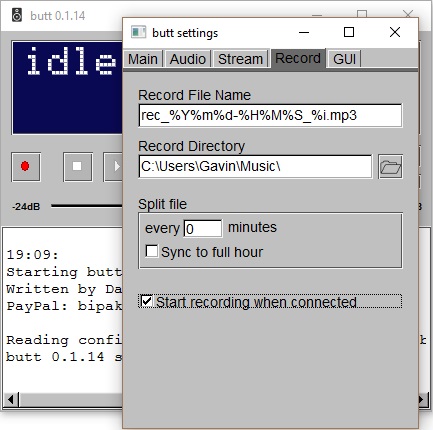
8) Optional – recording your show
- In the Settings window open the Rec tab.
- Select a folder where BUTT will save recordings.
- Choose the format (for example MP3) and file naming pattern.
- Enable automatic recording if you want every live session to be saved automatically.
9) Connect and go live
- Close the Settings window to return to the main BUTT screen.
- From the server dropdown select your SHOUTcast or Icecast profile.
- Start playing audio from your mixer or software.
- Click the Play button in BUTT to connect to the server.

- If the connection is successful, the status bar turns green and shows the connected server.
- If you see an error, double-check address, port, password, type (SHOUTcast/Icecast) and, for Icecast, the mountpoint.
10) Test your stream
Open your public stream URL or web player from your radio panel in a browser or in a player such as VLC. If you can hear your audio, BUTT is successfully connected to your SHOUTcast v1 / v2 or Icecast server.
Next time you want to go on air, just open BUTT, select the server profile and press Play.
 Add to Favourites
  Print this Article
